
The
Urban Aquaculture Manual
Table
of Contents • Chapter
1 • Chapter
2 • Chapter 3 •
Chapter 4
The Urban Aquaculture Manual
by Jonathan Woods
Sponsored
by Heifer Project Internationalwith
assistance from the
Evangelical Lutheran Church of America
Chapter Two
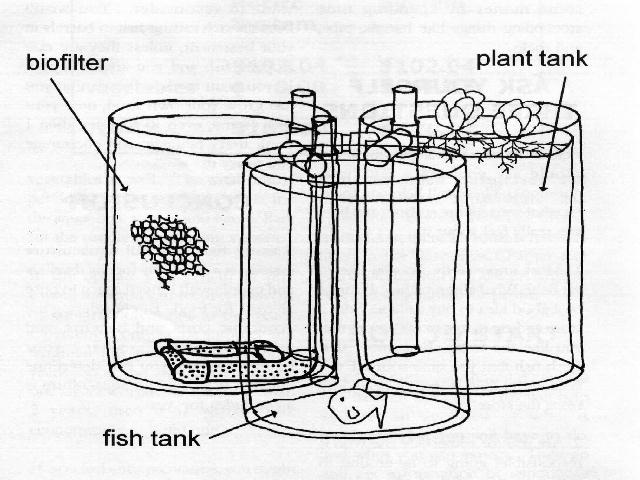
A Simple Recirculation System
INTRODUCTION
This chapter describes how to build a simple, inexpensive and compact aquaculture system. It fits Into a four foot by four foot space, runs off of one double-outlet air pump, and is easy to maintain. This is an ideal system to learn about aquaculture without spending a lot of money. The system described in this chapter has been built by ordinary people living in Toronto, Chicago, Little Rock, and Milwaukee. They didn't know much about aquaculture or even plumbing, but they shared a willigness to try something new and were successful.
HOW THE SYSTEM WORKS
The following is a quick account of the processes that occur in this recirculating system. Look for sources of additional information about how such systems work in the Resources Chapter.
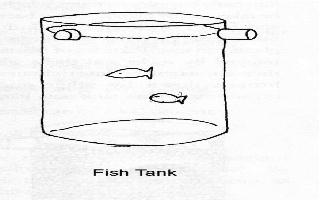
This system mimics natural cycles. The sun (or artificial light) shines into the plant tank, causing aquatic plants and algae to grow These plants and algae flow into the fish tank (or are cut and fed) where herbivorous fish cat them. After digestion, the fish excrete ammonia (a sort of urine) and produce feces. These are partially broken down by snails and other invertebrates in the bottom of the fish tank and then pumped 'into the b1ofilter tank.
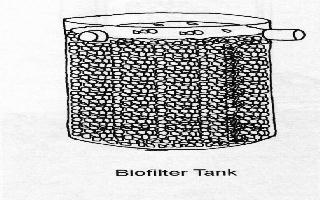
In the biofilter tank, specialized bacteria break down toxic ammonia into fairly harmless nitrates, which can be taken up by plants. Other bacteria and micro-organisms break down other waste products into forms that plants can use. Particles of waste are trapped by rocks and shells where they are eaten by invertebrates or broken down by other microorganisms. This tank acts like an aquatic compost pile, converting wastes into fertilizer for the plants.
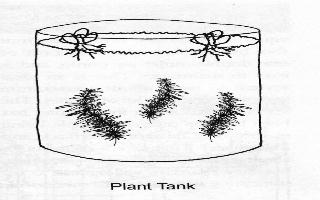
Finally, the fertilized water flows into the plant tank, where it is taken up and converted into plant tissues. Submerged plants and algae add oxygen to the water when the sun shines. Clean water, oxygen, and green plant food flow into the fish tank, completing the cycle.
SITE
This system should be located in a warm sunny spot with a water source and drain nearby. It should sit on a strong floor that is level, and should be protected from vandalism and curious hands.
It is very important that the system is level. If not, the air-lift pumping system will not work well. Most houses and buildings are built with level floors - test the floor with a level or put a marble down and see if It rolls. If working on bare ground, try to tamp the earth down with a board where the system will go. This will prevent compression and uneven settling. A good idea is to put the system on top of a piece of plywood or a pallet.
PARTS AND TOOLS NEEDED
Hardware
3 - 55 gallon plastic barrels. These should he food grade (i.e , no chemical residues) and at least one should be semi-transparent.
1 - 10' long piece of 2" PVC pipe.
6 - 2" male adapters.
![]()
6 - 2" female adapters
.![]()
3 - 2" tee (T) fittings.
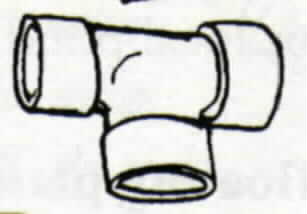
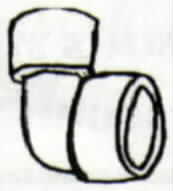
3 - 2" L fittings.
1- aquarium air pump with double air outlet. Get a medium-sized one (e.g. the Elite 802 which produces 2500 cc/min. of air at 4.0 PSI)
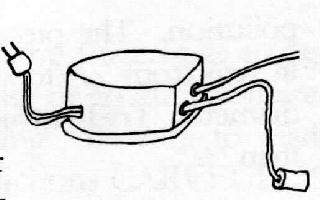
2 - aquarium air stones.
1 - 10' long piece of aquarium air tubing (1/4" clear polyethylene).
several clean rags.
1 small can of PVC primer.
1 small can of PVC cement.
1 roll Teflon (plumbers) tape.
1 - tube of clear silicon sealant (bathroom or aquarium grade). Be sure that it is true silicon sealant, as synthetic sealants can be toxic.
several small pieces of window screen, preferably plastic, to cover pipes and prevent fish from escaping
2 - strong elastic bands.
40 gallons of crushed rock, brick, gravel, or other coarse rock-like material, washed to remove dirt and pollution. The pieces should range In size from 1/2" to several inches in diameter. Try to avoid pieces smaller than 1/2".
1 - 2' by 2' square piece of burlap or other strong, coarse cloth
10 gallons of oyster shells or dolomite, making sure that most of the pieces are larger than 1/2".
Tools
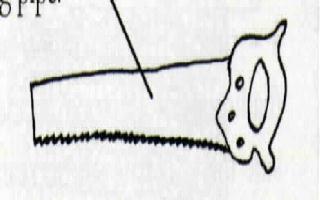
saw
- to remove tops from the barrels and cut pipe. A Skill Saw
(or "Jigsaw")
is probably the best for removing the tops, but a hand saw works well for cutting pipe.
scrub brush or sponge for cleaning up barrels and pipe
sandpaper or a small file for removing burrs from cut edges
felt pen to mark the barrels and pipe for cuts
power
drill for drilling through-hulls 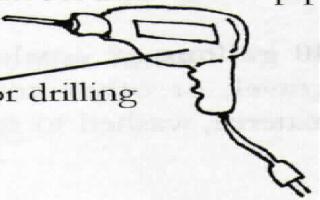
1/4" drill bit for making holes in filter in Pipe
2
1/4" hole saw (large bore drill bit) to drill holes for through
hulls![]()
caulking gun
2 pipe wrenches or large pliers - for tightening through-hulls (optional)
scissors - to cut plastic screen and burlap
Biological Materials
buckets of water (with some bottom mud or sand) from local lakes, rivers or ponds
1 quart of fresh compost
1 quart of good garden soil
1 quart of soil from a forest
1 quart of soil from a meadow
20-30 snails from an aquarium store or local pond
floating plants such as water lettuce or water hyacinth
20 - 30 fish fingerlings (nile tiapla are recommended)
CONSTRUCTION PROCEDURE
Most of this system can be built in two days if you can get all the materials together. Washing and leaching the barrels takes several days to do properly, so plan to do this before the actual construction. It is a good idea to let the system stabilize for a few days before adding any fish,
so arrange for the fingerlings to be delivered a week or so after you are finished building. Be sure to read ALL the instructions CAREFULLY before starting to build so that you know what has to be done next.
STEP 1. Rinsing the barrels.
You can obtain empty 200-litre food grade polyethylene barrels from food factories, breweries, recycyling centers, and many other places. Big cities often have dealers who buy and sell used barrels, or you could call your local recycyling organization. Rinse out the three barrels with a garden hose. Even food-grade barrels could contain toxins, so you should always handle them with care. Wear gloves, long sleeved shirts, long pants, and safety glasses when rinsing. You can drain them by tipping them over (hard) or using a sipihon (easier).

STEP 2. Leaching the barrels.
Leach the barrels. Barrels can be leached by filling them with water, letting them sit overnight, and then draining them the next day. Do this several times, using hot water if available. This will draw out any rest 'dues that have been absorbed by the plastic and may be harmful to fish.
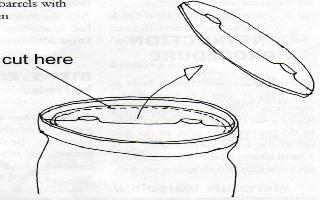
STEP 3. Cutting the lids out of the barrels.
Cut out the lids of the barrels, leaving the rim intact. The rim provides support for the barrel, so it Is important not to cut it off There are several ways of cutting the lid out, depending on what tools you have. You can drill a small hole and then use a skill saw, or you can drill holes all the way around if you don't have a saw.
STEP 4. Washing the barrels.
Wash the barrels. Use soap, warm water, and a scrub brush or sponge. You should wear rubber gloves to protect your hands as well as a long sleeved shirt. You could use a mop, or take the barrel to a commercial car wash where you can use their pressure washer. Rinse off the soap, re-fill with water, and let them leach overnight again.
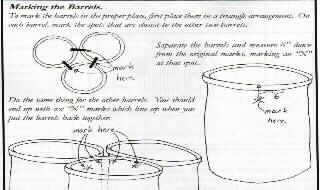
STEP 5. Placing the barrels and marking the through-hulls.
Arrange the barrels into a triangle on the site you have chosen. Using the felt pen, mark each barrel at the point where it is closest to the other two. Now measure six inches (6") straight down from each point and draw a cross mark. This will be where you drill the- holes for the connecting pipes.
Each barrel should have two crosses. Double check your measurements by measuring from the cross mark to the floor. All the cross marks should be the same distance from the floor.
Put the barrels back into the original triangle. Eyeball the crosses to make with sure they line up. Water will not practice circulate well if the crosses are not at quite the, same level.
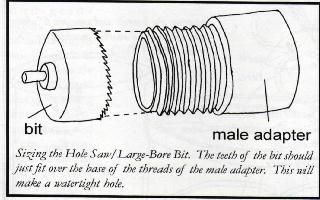
STEP 6. Drilling the through-hulls.
Check the 2 1/4" large-bore drill bit against a male adapter. The bit should be slightly narrower than the threads of the adapter. That way the adapter can be screwed into the hole you drill, ensuring a snug fit. Straddle the barrel like youíre riding a horse, or get somebody else to. Carefully drill a hole, using the cross mark center. Remember to hold the drill straight up and down and lower it slowly. Bracing the drill with your other hand will help you cut an even, clean hole.
You can practice drilling holes through the lids you removed in STEP 3. Even if you are handy a drill, it is still a good idea to drilling because plastic drills differently from wood.
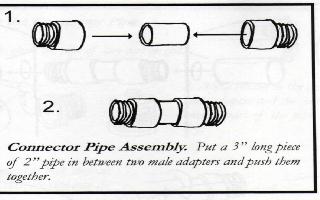
STEP 7. Connector pipe assembly.
Make the connector pipes by cutting three 3" long pieces of 2" pipe. Try to cut the pipe as square as possible. Use a knife and some sandpaper to
smooth the cut edges. Dry fit (i.e. put together without using cement) a connector piece of pipe between two male adapters. You should be able to see a little bit of the pipe in between the adapters when it is pushed into them as far as possible. Make two more sets from the remaining 3" long pieces of pipe and the male adapters.
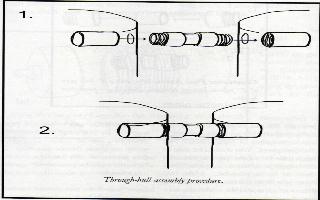
STEP 8. Through-hull assembly.
Assemble the through-hull fitting as follows. First dry fit a male adapter through each hole, from the outside of the barrel in. Then GENTLY screw a female adapter onto each male adapter, but do not tighten at this point.
Put the other two connector pipes together by screwing them into the other two sets of holes. GENTLY screw on some female adapters. At this point, all the barrels in your system should be connected together 'in a triangle.
Now that all the pipe connectors and through-hulls have been put together, have a close look at the barrels. The barrels should be close together and level, and the three connectors should not be bent at funny angles or appear to be under stress. Check that the system is as you want it before you start cementing it together in the next step
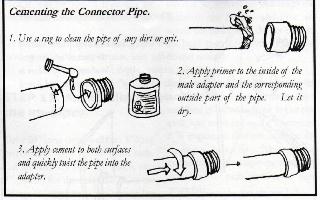
STEP 9. Cementing the connector pipes.
WARNING: Primer and cement are dangerous chemicals. You should always wear rubber gloves and work in a well- ventilated area when using ' these chemicals. Be sure to read the ALL safety instructions on the cans before opening them!
Disassemble one of the connector pipes by unscrewing the male and female adapters and removing the connector pipe from between the two male adapters. You should have two male adapters, two female adapters and a 3" long piece of 2" pipe. Using a rag, wipe clean the inner surface of one of the male adapters and the outer surface of one end of the 3" long piece of pipe. Apply primer to all these surfaces and allow to dry.
Working quickly, apply PVC cement to the inside of the male adapters and the corresponding surface of the 3" long piece of pipe. Twist the pipe and the adapter together, making sure that you have pushed the pipe in as far as it will go. Wait for a few 11-11inutes until this joint sets, then cement the other male adapter to the other end of the connector pipe. Repeat this procedure for the other two sets of connector pipes and male adapters. Allow the cement to dry for 20 minutes before moving on to the next step.
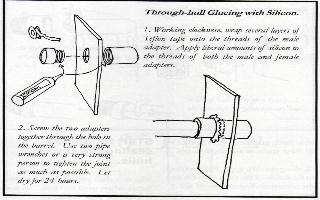
STEP 10. Silicon sealing the through- hulls.
Silicon sealant can produce irritating fumes when used indoors. Be sure to ventilate your workspace as much as possible. Also, you should try not to get it on your skin or clothes, as it is very difficult to remove.
Take one of the connector pipe/male adapter sets that you made in STEP 9 and wrap several layers of Teflon tape around the threads of one of the adapters. Be sure to wrap the tape clockwise around the threads, otherwise it will bunch up. Generously cover the tape and threads with silicon sealant and twist the adapter through the hole in the barrel. Squirt a bit of silicon 'into the female adapter and begin to screw it onto the male adapter from inside the barrel. As you tighten, it will become harder and harder to turn the adapter and silicon will start to squeeze out from between the male and female adapters. Put on some work gloves to protect your hands and tighten the joint as much as you can. If you have a couple of pipe wrenches, then use them to make the joint as tight as possible. Grab one adapter with each wrench and turn the two wrenches in opposite directions. It is important that a generous amount of silicon gets squeezed out between the adapters by the force of tightening, as this makes the joint waterproof.
Repeat this process for the other five male adapters to female adapter joints. By the end of this step all three barrels will be joined together by waterproof connector pipes.
Let the silicon dry for 24 hours before moving on to the next step.
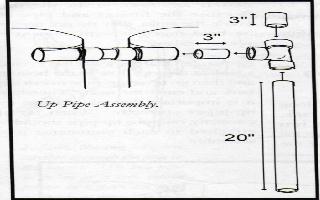
STEP 11. Assembling the up-pipes.
Cut a 20" long piece and two 3" long pieces of 2" pipe for the plant tank.
Cut another set (one 20" piece, two 3" pieces) for the fish tank. Use tee fittings to install them into two of the barrels as shown the diagram. Because the fittings and pipe are inside the tanks, they do not need to be held together with cement or silicon sealant.
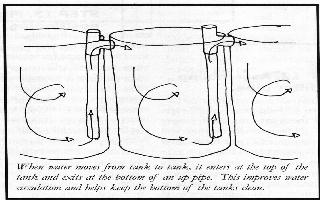
Remember that the water has to enter a tank at the top, flow to the bottom, and then go up an up-pipe to exit that tank and enter the next. Therefore, It is important that you arrange the up-pipes correctly. When set up correctly, only one up-pipe should be attached to each connector pipe assembly.
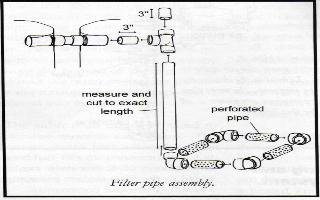
STEP 12. Assembling the filter pipe.
Cut two 3" long pieces of 2" pipe. Install these into the third, empty barrel. Now carefully measure and cut an up-pipe of 2" pipe for the filter tank. It is important that the intake lies flat on the bottom, so carefully measure the distance between the tee fitting at the top and the el fitting at the bottom. Using three more el fittings, cut short pieces of 2" Pipe to make the intake pipe as shown. You may need to trim these pipes to make them fit.
Once you have figured out how the filter assembly will fit, disassemble it and perforate the pipe by drilling º" holes approximately 1" apart over the entire surface of the intake. This will allow water to enter the up-pipe without compromising the strength of the pipe. Reassemble the perforated pipe and install into the filter tank.
STEP 13. Final positioning.
Before- you put anything heavy into the tanks (like water or rocks) you should make sure that the tank is properly positioned. The plant tank should be in the sunniest spot. The entire system should be level. If you don't have a level, you can use a bowl full of water on a long straight board instead. If you are placing the system on gravel or on loose soil, you should position the whole system on top of a 4'by 4' piece of plywood or a large, sturdy pallet. This will prevent the system from settling unevenly
STEP 14. Filling the filter tank.
If you are building this system inside a budding, you should consider how heavy it will be and whether the floor will support it. The floors of most modern buildings will easily hold the weight of this system. If your building is old, and you are unsure about the strength of your floor, you should consult a professional engineer. They will be able to tell you if your floor can support a weight of 150 to 200 pounds per square foot.
Carefully fill the filter tank with the cleaned fill. "Cleaned fill" means things like crushed brick, rock pieces, large gravel, or other rock-like materials that are free of broken glass, metals, and other contaminants. Be sure to carefully rinse off any dust or mud, as this will cloud the water.
Place the fill piece by piece into the filter tank. You should try to put larger pieces in the bottom, adding medium and pieces as you get near the top.
When filling around the filter pipe, try to place the fill so that 'it doesn't rest directly on the pipe.
When the filter tank is three-quarters full, lay the sheet of burlap or filter cloth over the fill. The rest of the tank should be filled with calcium carbonate materials such as shells or dolomite chips.
STEP 15. Rinsing and leaching the system.
Fill the system with water from a hose. If the fill is dirty, then it will cloud the water with sediment. You may need to fill and drain the tanks several times in order to clear the water. When the water appears fairly clean, fill the system and let it leach for 24 hours. Drain the tanks and fill them again.
STEP 16. Inoculation.
Inoculate the tanks with biological materials. Sprinkle the compost and soils onto the top of the filter tank. Add the pond/stream/river water to in the other two tanks. Sprinkle snails into all three tanks. Two or three tablespoons of rotten milk can be added to the filter tank to encourage a healthy microbial community.
There are several places where aquatic plants can be added to your system. Emergent plants, such as watercress, can be planted directly into the filter tank. Floating plants, like water hyacinth, can be put on the top of e fish tank or the plant tank. If your plant tank is fairly translucent, submerged plants can be planted on the bottom of the plant tank, but try not to block the up-pipe intake.
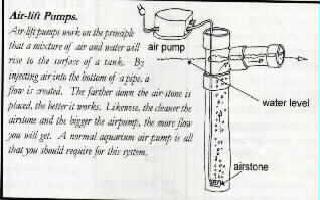
STEP 17. Installing the airlift pump.
Attach an air stone to a five-foot long piece of air tubing. Lower the air stone into the up-pipe of the fish tank, almost to the bottom of the pipe. Plug the other end of the air tubing into the air pump and Plug it in. Push it down as far as it will go without causing any bubbles to escape from the bottom of the pipe. You should see water moving as the air water mixture rises in the pipe and is forced into the next barrel.
The airlift is all that is required to circulate water in this system. The system works best when the water level half fills the connector pipes, so adjust the water level by adding or removing some water.
The other air stone and tubing should be suspended 'in the fish tank. This provides oxygen to the fish. You will have to weigh it down with a brick or rock. Remember to place the air pump above the system in order to prevent it from being flooded.
STEP 18. Preparing the system for fish.
You should let the system run without fish for a few days, so the various micro-organisms have time to stabilize. This also allows any chlorine that may be present in the water to be released into the atmosphere.
Chlorine is found in tap water and is toxic to most fish, so you should let tap water sit for 24 hours before using in any case.
Before introducing any fish, block off the entrance and exit of the fish tank with '/4" mesh or smaller to prevent them from escaping into the filter or plant tank. The mesh can be held on by elastic bands for easy cleaning.
If you are planning on keeping fish that require high temperatures (e.g. Tilapia), you will have to install a submersible heater 'in the system or put the system in a hot place such as a heated greenhouse. Because the system contains a lot of water, it will take a day or two for the water to warm up to the desired temperature.
STEP 19. Adding the fish.
You have to introduce the fish slowly to prevent them from being too stressed. If the fish came in a bag, open the top to allow oxygen to enter. Float the bag in the fish tank for an hour or so to allow the water inside the bag to come to the same temperature as the tank. You can hang the open bag from the tee fitting so that the fish don't swim out. Once the temperature is the same, add a little bit of water from the fish tank into the bag. Five minutes later, add a little bit more. Do this a few more times, then slowly tilt the bag underwater so that the fish can swim out of the bag and into the tank.
STEP 20. The first few days.
It is a good idea to cover the tank after first introducing the fish because sometimes fish will try to escape from a new tank. After a few days, the fish will become accustomed to their new tank and a cover will no longer be necessary.
When fish are first moved, they may not be as hungry due to stress. Feed them only a little bit at first, gradually increasing the amount of food as they become accustomed to their new environment.
If all your fish die in the first few days, then something is wrong with your system, with the fish, or something happened during transit. Call the person you got- your fish from and try to figure out what the problem could be. Usually, you can get replacement fish at a discount if you can convince the fish supplier that there was something wrong at their end.
MAINTENANCE
Regular maintenance helps keep a system healthy by spotting small problems before they become big problems. The regular tasks that you need to perform are listed according to how frequently they need to be done.
Daily Tasks
1. Feed the fish. You can feed fish until they stop eating, or feed them a set amount. Calculating the exact amount of feed to provide is quite complicated, so I suggest feeding them until they stop eating on a daily basis. It is important to watch your fish eat. If they aren't eating happily then there may be something wrong.
2. Check that the water level half fills the connector pipes and add water if necessary.
3. Check to make sure screens over the inlets and outlets aren't clogged.
4. Check the air stone to make sure that it isn't clogged and that the air pump is functioning properly. Clean or replace the air stone when appropriate.
5. Look at the fish to see if they seem healthy.
Weekly Tasks
1. Harvest excess plant materials feed to fish or put into compost.
2. Check sediment levels at the bottom of the fish tank. They should not be building up but rather be removed by the airlift pump. If they have built up, use a siphon to remove any excess.
3. Check ammonia levels. There are numerous kits to measure ammonia available at aquarium stores - read the directions carefully. If ammonia levels are too high, cut back on feed and/or increase aeration (i.e. add another air stone to the fish tank.) .
Monthly Tasks
1. Harvest and restock fish, if required.
2. Remove 10 or 15 gallons of water from the system and replace with water that has sat overnight to let chlorine escape. Chlorine is present in all tap water and can kill or harm fish. By letting it sit in a bucket overnight, most of the chlorine will escape into the atmosphere as gas. It is a good idea to always let water that you Intend to use with fish sit overnight.
Use any water that you remove from the system in a garden. It is an excellent liquid fertilizer.
Yearly Tasks
1. Remove oyster shell/dolomite layer and rinse. Remove the filter cloth and rinse out any clogged sediment.
CONCLUSION
You are now the proud owner of a recirculating aquaculture system with live, happy fish in it. Congratulations! You should read the Maintenance chapter to find out what you should be doing to keep your fish and your system alive, growing and happy.